You do not need a feed to look around. CutlassEdge opens on built-in sample data. When you want live charts, connect one of the feeds below.
The feeds at a glance
- Interactive Brokers. Live futures charts, profiles, TPO, and volume, from your own IB account. This is the main path, and the one most people use.
- Databento. Adds exact, executed volume-at-price, the tick-based volume and footprint tools, from your own Databento account.
- CSV import. Load historical bars you exported from another source. No account needed, bars only.
- Sample data. Built in and offline, so you can try the app with no account at all.
You run one live feed at a time, either Interactive Brokers or Databento.
A note on cost: the feed is separate from your CutlassEdge subscription, and you pay the data provider directly. That is why CutlassEdge is priced as software only, and it is also why your data stays yours. It comes from your own account, on your own machine.
Interactive Brokers
This is the main way to get live futures data into CutlassEdge. It uses a small, free program from Interactive Brokers called IB Gateway, which logs into your account and passes the data to CutlassEdge on your computer. Plan about fifteen minutes if you already have an Interactive Brokers account with the CME data subscription. A brand-new IB account takes longer: opening and funding it, and the data subscription going active, can take a few days, so start early.
What you need
- An Interactive Brokers account. A paper (practice) account works for charting, but only after you switch on one setting so it streams your real-time data (covered in Step 1). A live account needs no extra step.
- The CME market-data subscription called CME Real-Time (NP,L2) on that account. Without it, ES and NQ show a permissions message instead of a chart. Adding it is covered below.
- A minimum account balance. Interactive Brokers requires a minimum $500 equity balance to subscribe to and maintain market data. Keep at least enough to cover your monthly market-data fee on top of that $500 minimum.
- IB Gateway, free from Interactive Brokers.
Step 1: Install and log into IB Gateway
- On the Interactive Brokers website, download IB Gateway (choose the stable version) and install it.
- Open IB Gateway and log in. A paper login is fine, so you do not need to run a live one. If you are on paper, turn on real-time data for it first (the note above), or it charts delayed data.
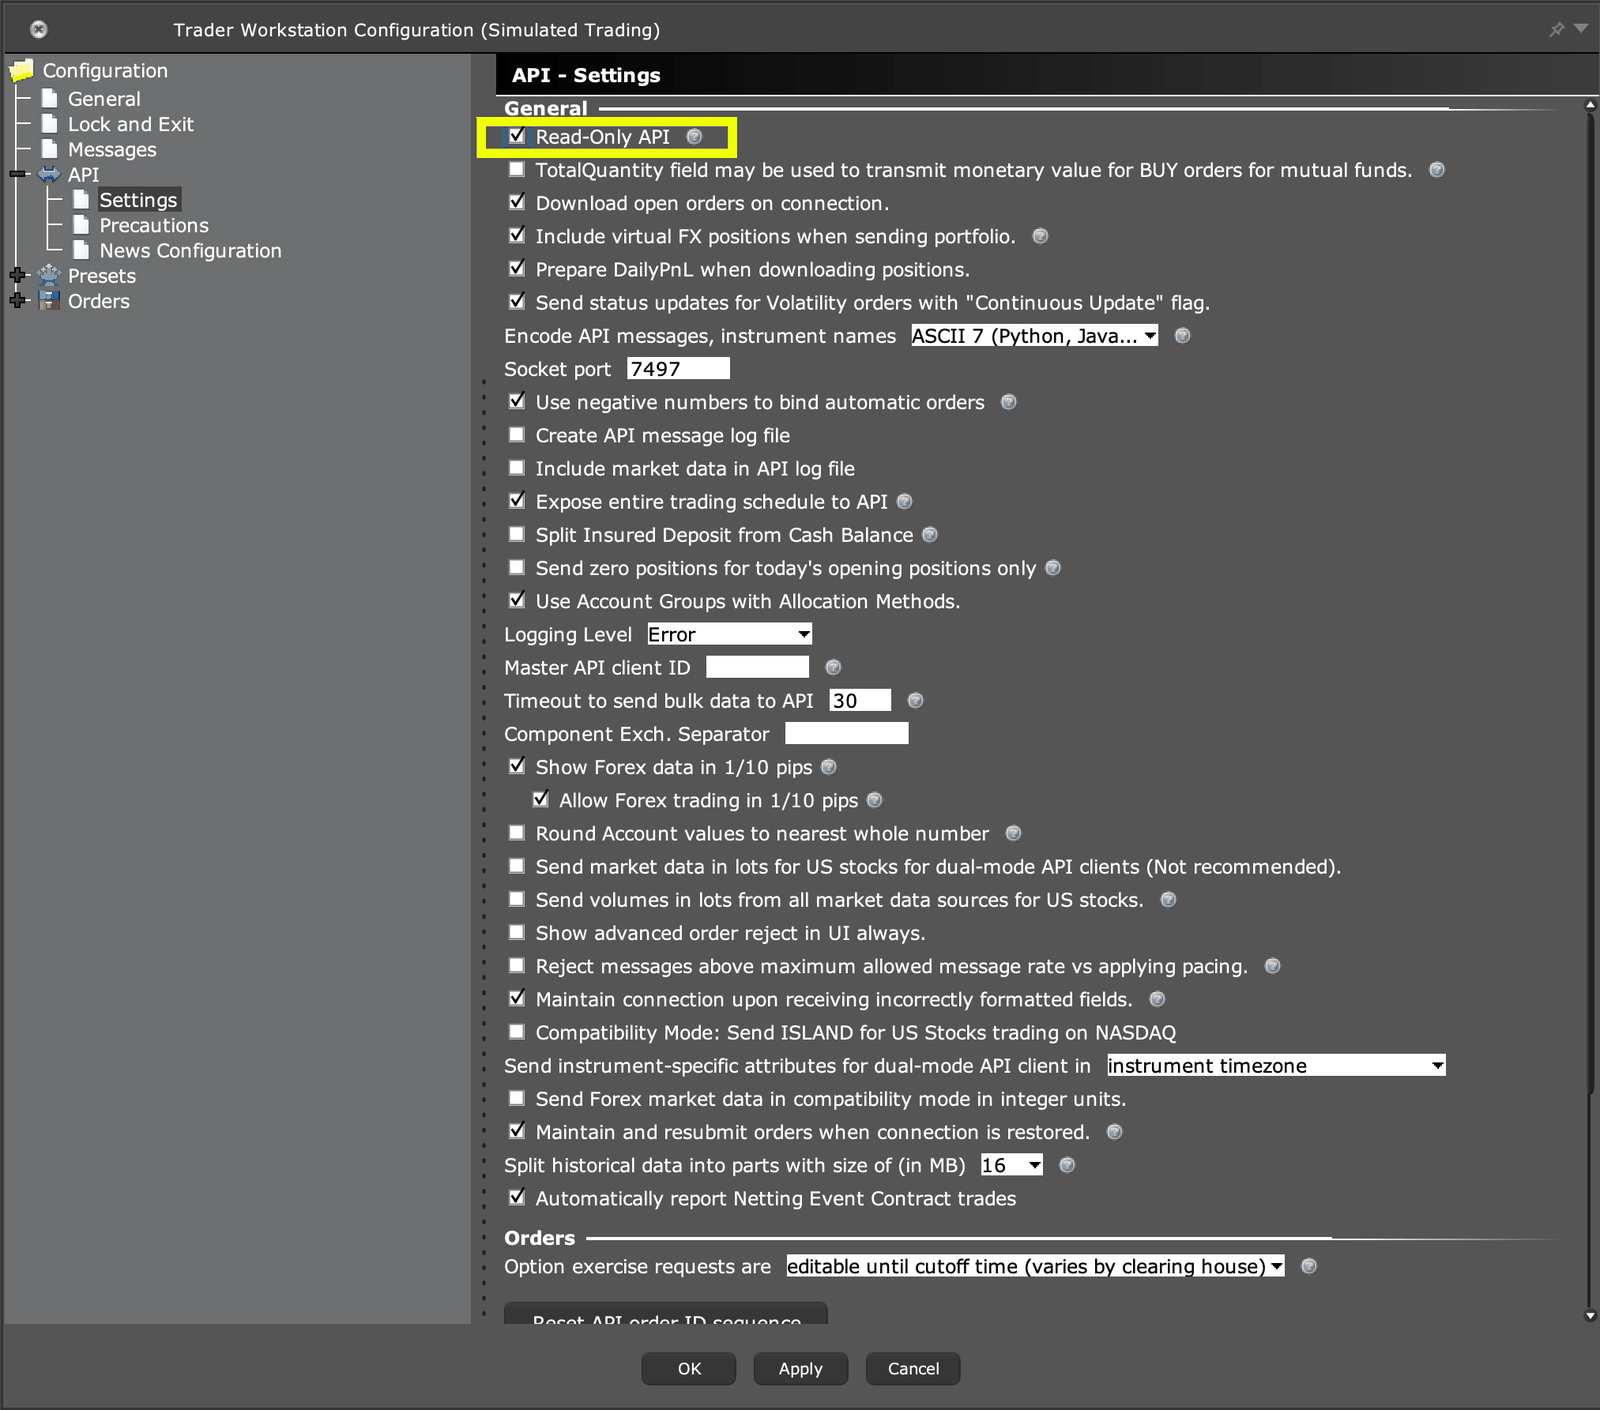
- Open the settings once: Configure, then Settings, then API, then Settings. Two things here are normal and not a problem:
- The window may call itself "Trader Workstation Configuration" in its title bar even though you opened it from IB Gateway. Interactive Brokers uses the same settings window for both programs.
- There is no on-off switch for the connection, because IB Gateway's connection is always on. The full Trader Workstation program has an "Enable ActiveX and Socket Clients" checkbox; IB Gateway does not need one, so it is not there.
- Tick Read-Only API if it is not already ticked. CutlassEdge never trades, so read-only costs you nothing and adds a lock at the Interactive Brokers end.
- If you see Allow connections from localhost only, leave it ticked. CutlassEdge runs on the same computer as IB Gateway.
- Leave the port number alone. Whatever it is, CutlassEdge finds it by itself.
- Add 127.0.0.1 to Trusted IPs, so IB Gateway accepts the connection from CutlassEdge on your machine.
- Click OK.
The first time CutlassEdge connects, IB Gateway may pop up "Accept incoming connection." Click Accept. Leave IB Gateway running and logged in whenever you want live charts.
IB Gateway restarts itself once a day. In Configure > Lock and Exit, choose Auto restart and set the time to outside your trading hours, so it never restarts mid-session. CutlassEdge notices the restart and reconnects on its own.
Step 2: Connect CutlassEdge
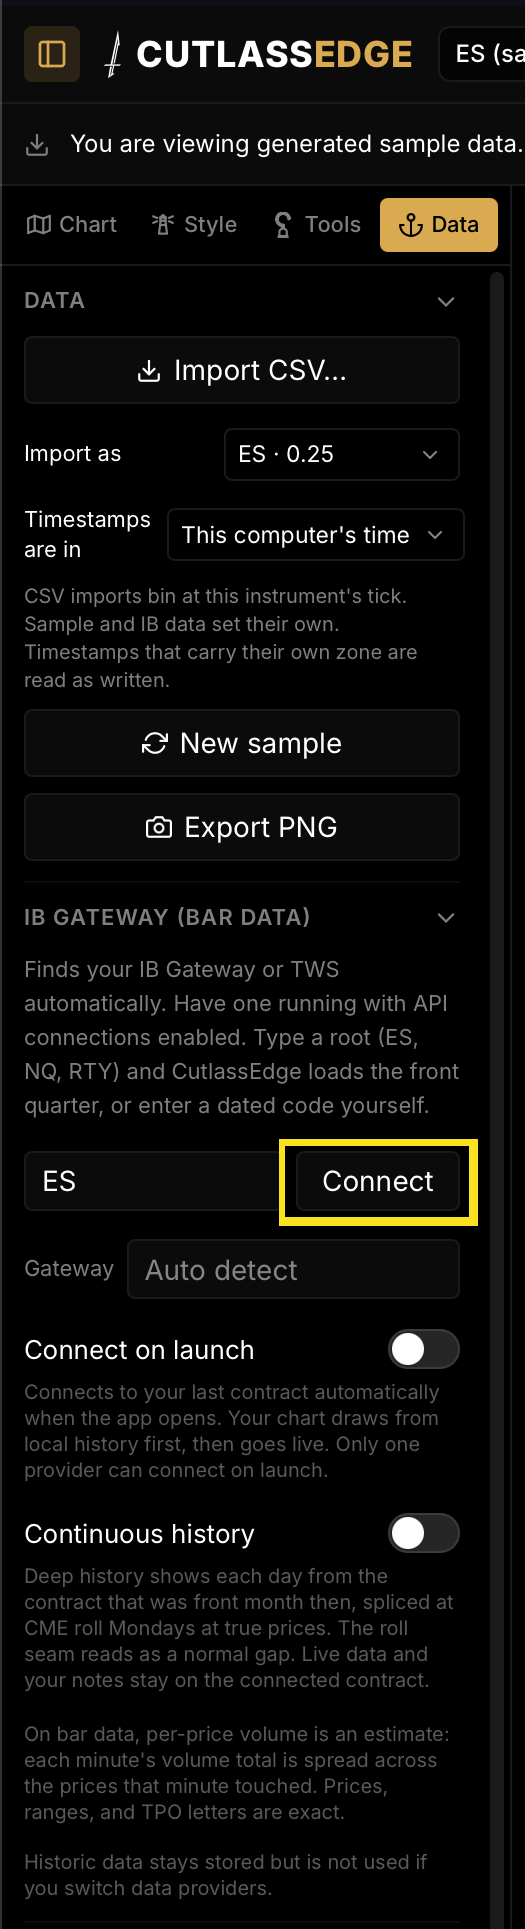
- In CutlassEdge, open the narrow rail down the left edge and click the Data tab (the upload icon). If the rail is hidden, click the Connect your data strip near the top.
- Find the section titled IB Gateway (bar data).
- In the first box, type the market you want: ES for the S&P 500 E-mini, or NQ for the Nasdaq 100 E-mini. You can also type a dated code like ESU6, but the short root is easiest and finds the current contract for you.
- Leave the Gateway box on Auto detect. That tells CutlassEdge to find IB Gateway by itself, so you never need a port number.
- Click Connect.
Step 3: Confirm it is live
You are connected when all three of these are true:
- The status line reads Live, followed by a bar count.
- The dot at the top of the window turns green and reads IB live.
- The price at the top and along the right edge starts moving at market speed.
The TPO letters and the volume bars rebuild a few seconds behind the price. That delay is on purpose: the price ticks instantly, and the structure follows the official minute data a few seconds later.
Turn on the Connect on launch switch in the IB Gateway (bar data) section, and CutlassEdge reconnects to your last market by itself every time you open it.
Reading the connection dot
- Green, "IB live": connected and live.
- Gold, "IB idle": the link is healthy, but the market is quiet right now (overnight, a holiday, or the weekend). Nothing is wrong.
- Red, "IB disconnected, retrying": it dropped and is reconnecting on its own. You do not need to click anything.
If it does not connect
- "Could not find IB Gateway or TWS on this computer" (it lists the ports it tried): IB Gateway is not running, or is still logging in. Start it and log in. CutlassEdge keeps scanning and connects within a few seconds, no click needed.
- A permissions message (IB error 354): your IB account is missing the data subscription for that market. Log in to Interactive Brokers account management (Account Settings, then Market Data Subscriptions) and add CME Real-Time (NP,L2) for ES and NQ. Other markets (oil, gold, bonds) need their own package. This is an Interactive Brokers subscription, separate from CutlassEdge.
- "No security definition has been found" (IB error 200): the exact contract you typed does not exist. Type just the root, ES or NQ, and let CutlassEdge pick the current front contract for you.
Do not run the same login twice
Do not log the same Interactive Brokers user into a second IB Gateway or TWS somewhere else. Interactive Brokers allows only one login and will disconnect the first. This is their rule, not ours.
One session at a time
Interactive Brokers lets only one of your logins stream your market data at once. If you share data to your paper account, your live and paper logins cannot both be running at the same time, and the same goes for the IBKR mobile app or a second copy of Trader Workstation. If your prices freeze and then jump to catch up, this is almost always why. Close the other session (the phone app is the easy one to forget), and leave only the one CutlassEdge uses.
Databento
Databento is the second live feed. Where Interactive Brokers gives you bar data, Databento gives you exact, executed volume-at-price straight from the tape. That is what powers the tick-based volume and footprint tools. On bar data, the volume at each price is an estimate: each minute's total volume is spread across the prices that minute touched, though the prices, ranges, and TPO letters are still exact. On tick data, the volume at each price is the real, executed number. There is more on this in TPO and volume profile.
Databento is a paid subscription that you buy from Databento directly; see their pricing. Your key and your data stay on your machine, the same local-first way your Interactive Brokers data does. Remember you run either Interactive Brokers or Databento as your live feed, not both at once.
Databento's CME futures come from a single dataset called CME Globex MDP 3.0. It contains ES, NQ, RTY, GC, ZB, CL, MBT, and thousands of other symbols.
Step 1: Get a Databento account and key
Create a Databento account, then open your API key in your Databento account, under API keys.
Step 2: Save your key in CutlassEdge
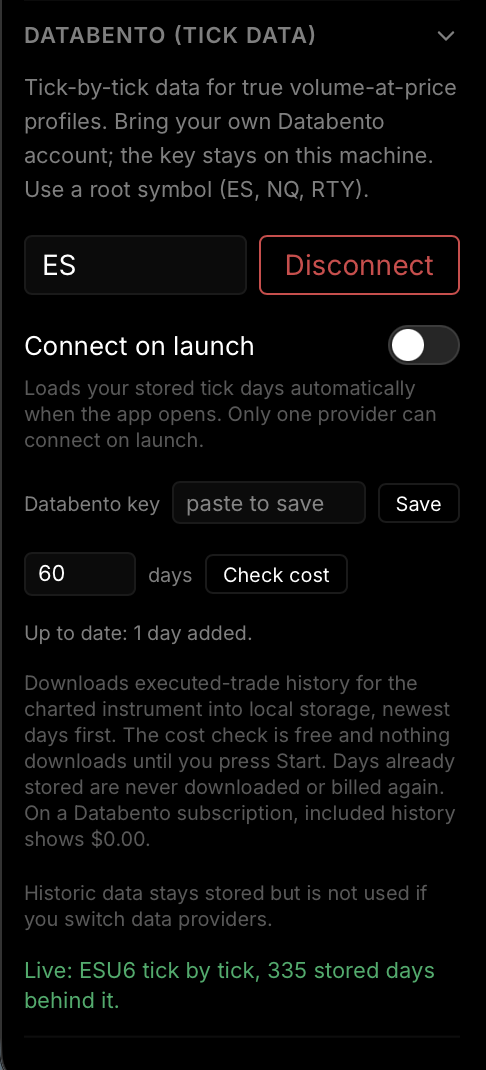
- Open the Data tab and find the Databento (tick data) section.
- Paste your key into the Databento key box and click Save. CutlassEdge confirms with "Databento key saved on this machine." Your key never leaves your computer.

Step 3: Download some tick history
Tick profiles are built from executed trades, so pull a little history first.
- Type a root symbol in the box at the top of the section: ES, NQ, or CL.
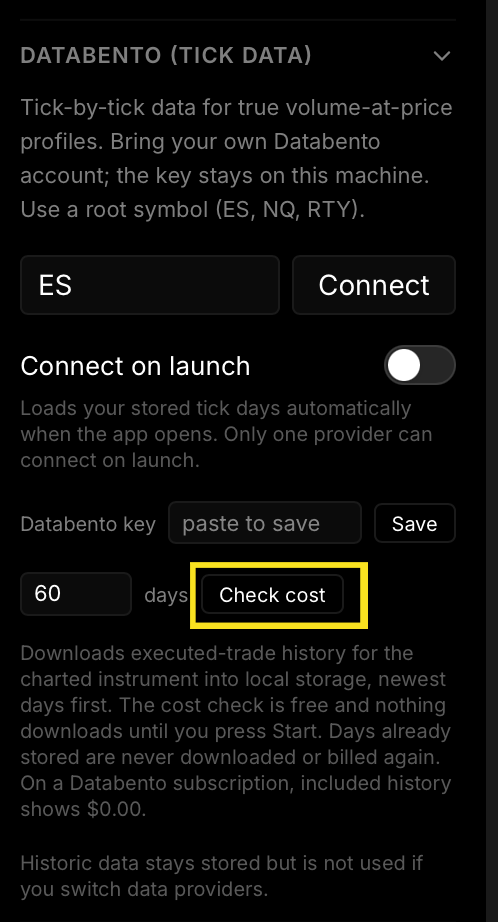
- Set how many days you want (60 is a good start) and click Check cost. The check is free, and nothing downloads yet.
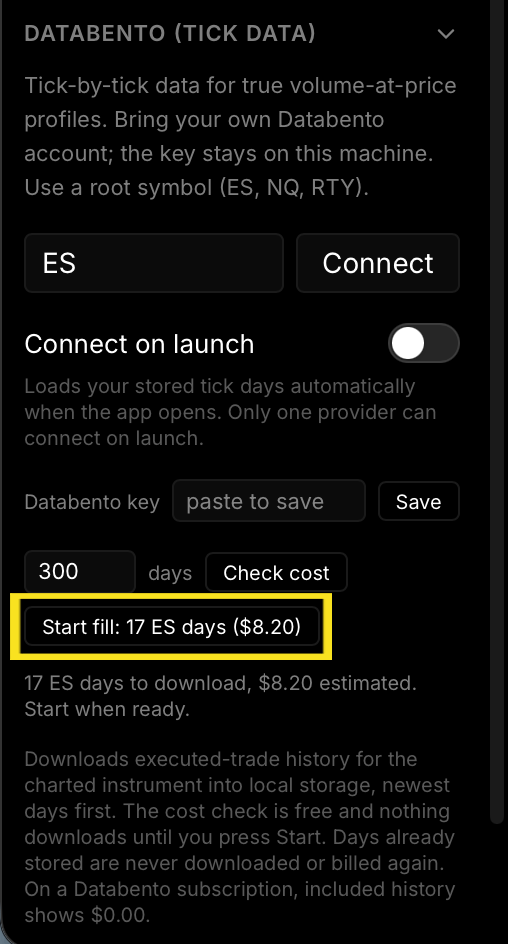
- Click Start fill to download. On a Databento subscription, included history shows $0.00. Days you already have are never downloaded or billed again.
Step 4: Connect and go live
Click Connect. CutlassEdge loads your stored tick days, and with your key saved it goes live, tick by tick. Turn on Connect on launch to start on Databento by itself next time (only one feed can connect on launch).
The dot at the top reads Databento live when it is streaming, Databento idle when the market is quiet, and Databento reconnecting if it drops and is recovering on its own.
Switching between IB and Databento
Only one live feed reads at a time. To move from one to the other, disconnect the one you are on first. Nothing is deleted by switching: your stored bar history and your stored tick history both stay on your machine, and each feed reads its own.
CSV import
If you already have historical bars exported from another source, you can load them into CutlassEdge with no account at all. This brings in bars only: no live updates, and no per-price volume detail. On the start screen, click Import and choose your file, or drag a CSV straight onto the window.
Your CSV needs a timestamp column (a date, or a full date and time, in ISO format like 2026-09-04T14:30:00, or a Unix epoch), then open, high, low, close, and, optionally, volume.
Sample data
CutlassEdge ships with built-in sample data so you can explore offline, with no account and no feed connected. This is what you see on first run. Switch to a live feed above whenever you are ready.
Good to know
- The feed you connect is separate from CutlassEdge and separate from your subscription. You pay the data provider directly, and the data comes from your own account.
- Session times follow exchange time (Chicago and New York), whatever your local clock says.
- Your chart history is cached on your computer, so opens are fast and your history builds up every day you run the app.